Player Self Evaluation - Style of Play or Skill Preference
The following evaluation is a visual breakdown of your natural style of play. Each drawing, albeit crude (will be updated to pictures later on) should provide you with a sort of reference from which to evaluate yourself. Underneath each drawing is a square in which you should mark and "X" after determining which example best represents your style of skating, puck handling, shooting, etc "MOST OF THE TIME". You can send me this form by fax at 604-585-2262 or e-mail me at wawryko@direct.ca and I will provide a personal evaluation based on the information provided for a fee of $50 payable by cheque to Quan-Tech Sport Systems Inc. Each fundamental has specific strengths and weaknesses. While all players demonstrate one or more of these body, stick, hand alignment fundamentals, each has a specific place in the game which maximizes effectiveness.
Diagram No. 1, 2 - Body alignment. Mark which style best represents your style of skating: A1 - Straight line striding A2 - Cross-over Skating
In diagram A1, young players or players that are too tired to utilize correct form, bend over to try to maximize effort. This is due to the fact that the Gluteus muscle (butt) is stronger than the muscles of the lower thigh and therefore fatigue later. In diagram A2, players tend to lean forward due to lack of balance in most cases (insufficient outside edge control) or stand up too straight as in model (3) which more specifically demonstrates weak thigh muscles (a growth spurt perhaps).
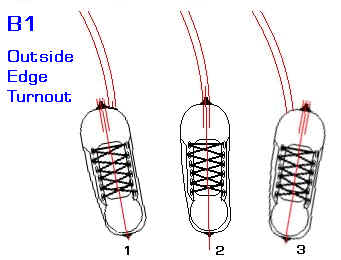
In diagram B1, the diagram specifically describes the position of the inside foot / outside edge during the crossover which in this case would be to the players left. The position of the blade shown as a red straight line through the skate model is best described in 3 ways: 1 - Up ice position 2 - Neutral position 3 - Down ice position. The neutral position describes the position of the skate on the exact radius of the circle being skated (real or imaginary). The up-ice position places the player in an pre-mature "open hip" position which causes a player to break out of his crossovers early into a straight line attack. The neutral blade position causes the players to slip his outside edge and can be identified by a heel kick on recovery as well as an incomplete extension. The down-ice position allows a player to get to his outside edge quickly allowing for maximum thrust and extension as well as correct knee action on recovery.
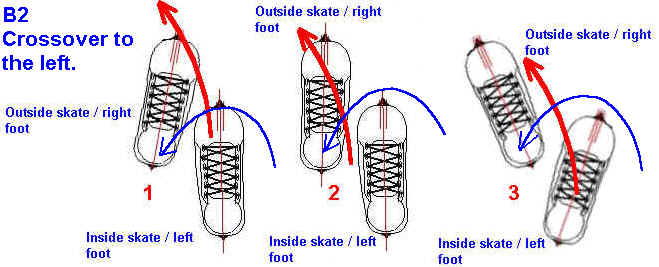
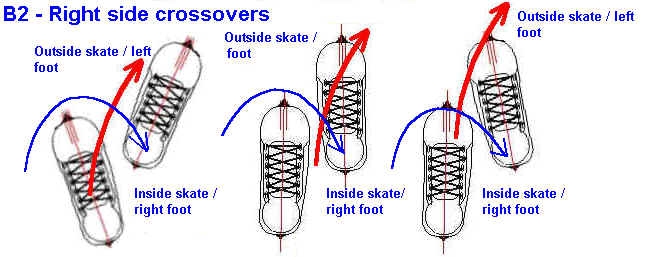
Diagram B2 (left and right sides) represents the position of the skate on the crossover. Is the outside foot pointing down ice or "leading with the heel" (1), neutral position; leading slightly with the heel or flat of the blade (2) or up-ice, leading with the toe of the blade (3).
The following diagram C1 and C2 represents the outside foot; crossover (C1) and ice-contact position (C2) . Mark which foot position best represents your outside foot position on crossover as outside foot crosses over inside skate and position or angle of boot upon contact with ice.
In diagram C1 - (1) is close boot position with toe down, (2) is again with toe down slightly but ahead of inside skate, (3) is blade in a level position as it comes up and (IN FRONT OF - NOT OVER) the inside skate and (4) - Is ahead of and again, NOT OVER the inside foot with the heel down.
In diagram C2 - (1) is contact with the heel first, (2) is, blade making contact flat on the ice and (3) is high heel position or about 20+ degree angle with the blade making contact with the ice on the toe.
In diagram C3 - (1) toe of blade makes contact with ice first at maximum angle, ankle then flexes so that the blade flattens to ice surface, (2) toe of blade again makes contact with ice first but at a much reduced angle, ankle again flexes so that the blade flattens to ice. (3) Toe of blade makes contact with ice first but there is no flexing of the ankle. In this case the player pushes the blade ahead so that the blade flattens and finally (4), toe or flat blade makes contact with the ice, player pushes foot into position.
Diagram D describes the Inside foot position on recovery. These pictures demonstrate position of the inside foot as player brings foot back to inside position after under cross (pushing through under body). Mark which style best represents your foot position. This is best viewed from the inside. Some players when bringing the inside foot into position or "stepping in" position the skate to far ahead of the outside foot. This in turn, causes slippage of the outside skate resulting in incomplete extension as well as poor recover action.
Diagram E2 Inside foot position on recovery (back view). These pictures demonstrate position of the inside foot on recovery from a back side viewing position. (1) demonstrates close foot position and (3) demonstrates wide foot position. Mark which one best represents your style of recovery. This is best viewed by watching a player from behind as they perform one crossover to each side as they move left to right, right to left down the ice. Players tend to take to much ice when crossing over to their backhand side on the step in.
%20stepin.gif)
Diagram F1 - Gliding turn. This turn represents either a moderate (not tight) to intermediate radius turn. Mark in the appropriate box which foot\ blade angle best represents your style of turning. (1) Knee is aligned over the toes, weight is distributed evenly over the middle of blade with the knees and ankles flexed, (2) Knee / leg is in a more upright position with body weight moving towards back half of the blade and, (3) Inside foot is ahead of the knee with heel making contact with ice.
Diagram F2 - Tight turn - inside foot alignment. Mark in the appropriate box which foot position best depicts your style of tight turn. This turn is a short radius turn. Look at the above text for description. There are two basic "correct" methods of tight turns: one is a slide skid turn which mimics stopping with weight transfer from the front of the blades to the middle (into a glide) then "slip" under cut and crossover exit. The second one is an open hip turn where the players opens the inside hip to utilize the out side edge to de-accelerate, closing the hip to glide and crossover exit.
Diagram No. 11 - Top hand carry position. The following diagrams represent top hand position in relationship to the front/side of the body when carrying puck. Some players carry their top hand off their hip (3) while some carry their stick in a more frontal position. Mark the diagram which best represents your style (MOST OF THE TIME).
Diagram No. 3 (below B1) - Stick Lie / Basic carry position. Mark which style best represents your style of stick (lie) or stick carry position.

Diagram G1 Depicts basic stick lie used as well as hand "primary hand position" on the stick. Mark which style best represents your style of carrying puck with two hands. Do you grip stick firmly with both hands (static position) or do you vary your bottom hand grip position continually which is shown in Diagram G2.
Diagram No. 5 Front tracking position. Mark which style most closely represents your striding position from a frontal view. (1) shows inside leg crossing center line of body (COB) where player starts stride from outside edge position. (2) shows shoulder width position where player skates primarily with their thighs keeping their upper body fairly rigid, and (3) shows wide tracking position.
![]()
In the following diagram H1, pick the top / bottom hand position on the stick that best represents the way you carry your stick the most often during game play. (1) top hand to the front of the body (2) top hand just off the hip and (3) top hand to the back side of the hip.
Diagram H2 - Tight turn puck control. The following diagrams represent top hand position prior to executing a tight turn. When executing a tight turn (forehand side) from which hand position do you initiate your tight turn from the most often. Remember, this is to the forehand side only.
Which side of the ice do you tight turn the most often?
Backhand side _______ Forehand side ________
In the following Diagram I, pick the diagram that best represents lateral movement of the puck side to side when striding down the length of the ice. As in diagram (1), does the puck cross the center line of the body on the when switching to backhand side of the blade, (2) does the puck come ahead of the outside leg position which switching to the back hand side or (3) move completely across both sides of the body maximizing range on the backhand side.
Diagram J - Top hand Shooting Grip - Re-grip. If you do not change your top hand grip during your snap and wrist shots, mark box 1. If you do mark no. 2. The grip change shown is for the slap shot which is best when utilizing a 1/4 turn which places the blade and shaft in the maximal flex power position (requires good grip strength due to rotational action of shaft upon contact with the ice).
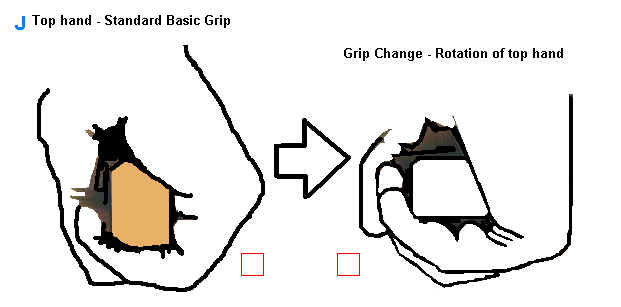
Diagram K - Shooting: Top / bottom hand relationship for wrist and snap shots. Players shoot various ways. Some lead with the top hand (extend away from the body first) and others keep the top hand close to the body and generate power from their bottom hand. Mark the box that best fits your shooting style.
Diagram L - Slap shot - top hand/arm blade position during windup or loading phase. This is best described by the position of the blade at the top of the windup. If the blade is pointing towards the ceiling and your back arm is bent, mark box (3). If your back arm is straight the the blade is parallel to the ice, mark (1), (2) is in-between.

More will be added later and as previously mentioned, pictures will be updated over the next month. Any questions can be directed to me at 604-838-9345. Good Luck!