
Off Ice Training Exercises
Explosive power and speed training:
Training to be explosive can be very injury threatening if one does not understand and execute the basics correctly. There is much literature on the subject explaining different exercises and methodology but for our purposes, I will try and simplify this in layman terms in the diagrams shown below.
Explosiveness is used in many sport applications. Whether swinging a tennis racket or extending your legs for a jump, the main objective is to get from a flexed position (starting position) to extension (finished position as fast as possible). Whether a single joint (ankle) or combination of joints (hip, knee, and ankle), the objective is still the same. However it is important to understand that while explosive movement is critical to all sports, it is the foundation of stop and start movements. This is where body or limb movement is minimal, accelerating to maximum velocity.
In the first diagram shown are two points A, B where A represents point of origin (perhaps squatting ready to jump) and B represents final extension (completed movement). The span between represents the distance that each joint, combination of joints, or desired action has to take place. The second diagram better represents for our example what actually transpires during an explosive movement. Shown are 4 points, A, B, C and D. A represents the initial starting position. B represents that actual starting position. Studies have shown that there must be a slight relaxation in form and muscle prior to actual execution. During a jump for example, if one was asked to squat in a ready position he would find that just a split-second prior to jumping, muscles would relax and body position would drop slightly. This action has been identified in all explosive movements from racket swinging to baseball pitching. The letter D represents the acceleration phase. While the bulk of energy output is when the movement is initiated we must be able to continually accelerate through the complete range of motion so as to maximum "end speed". In order to achieve maximum acceleration and maximum speed, several types of training techniques must be utilized.

Hockey is a game of movement where stopping and starting on a continual basis is not desired (anaerobic and very tiring). However, where initial explosiveness can come from a stopped or slight glide position a hockey player most often finds him/her self having to accelerate from various moving speeds. Using a car as an example, it would be like accelerating from zero, 20 k/per hour or from 60 k/per hour where top speed would be 100 k/per hour. Several combined training techniques must be used so as to recreate and develop as closely as is possible, the muscles and movements utilized within the hockey environment.
Demonstrated in the following pages are a series of progressions that enable an athlete to understand how to add various training techniques and intensity into their program in a logical manner. This progression is based on familiarity, strength of athlete and sport requirement or load demand. Standing up from a seated position or jumping up from a seated position obviously requires a different load demand on the leg muscles. As well, jumping 10 centimeters off the floor or jumping 1 meter requires a significant increase and recruitment of the muscle fibers of the legs. As well, jumping from a stationary position (basketball player going vertical) or from a moving position (track and field high jumper) requires two different training techniques.
Hockey, due to the nature of the skating stride and the intrinsic aspects of the game require certain physical attributes that are critical to a player’s success. Flexion and extension of the hips, thighs, knees and ankles albeit in an abducted manner (away from the body) are the primary muscles involved in skating. While jumping stimulates the gluteals, quads, and calves in a similar way to skating leg extension, the movement is not entirely sport specific. Lateral bounding would create a better game simulation however there is a small chance of injury (ankle and in some cases, the groin) , unless proper equipment (shoes or training surface) is used.
In the following diagrams a progression is used which places increasingly greater demands on the muscles of the legs. Depending on where you are in your workout program, you may or may not be able to use the most advanced. As with all training programs, one should venture into them carefully so as to not induce injury.
Diagrams No. 1 and No. 2 represent the concentric phase of jumping only. Shown in No. 1 is a single jump to a height progressing from low to maximum with the athlete walking down the other side to begin again. No. 2 represents the continual jump or "set" jump where several 5 to 15 are done in a row depending on the height and/or number of stairs (this set jumping can be done as well on a flat training surface which would diminish loading of the legs slightly).. "Set" jumping must be performed carefully since a backward slip could result in injury. Athlete lands in a crouched position. Height of jump should just enable the athlete to bring his feet under his body, just clearing the step. If this is not possible due to stair height construction, minimize eccentric action (lowering of the body weight).
Diagrams No. 3 and No. 4 involve eccentric action (the landing phase). No. 3 can be performed in singularly (one rep, maximum height, rest) or in a "set jump" manner going for reps and sets.
Diagram No. 4 is an example of a hockey specific training routine. Static position (in this case wall sit) for 5 seconds then an explosive jump/s (one or two performed immediately afterwards) then repeat after rest.
Diagram No. 1 Diagram No. 2
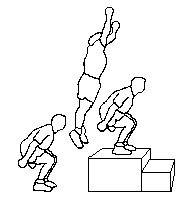
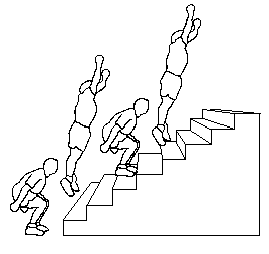
Diagram No. 3 Diagram No. 4
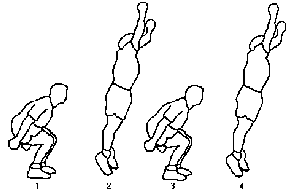
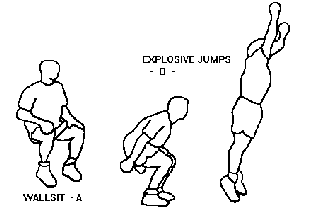
Diagrams No. 6 through to 8 progress eccentrically. This places even greater load on the muscles. Starting with Diagram No. 4 above would start this progression and as explained above, the athlete performs jumps after a static hold position. While the first jump is not eccentric, the second repetition would be.
Eccentric loading is very hard on the legs. What you are essentially doing is controlling the descent of the body on landing. There are several progressions to this type of action.
1. Standing erect, immediately drop as fast as you can into a crouch position. Hold then stand up quickly.
2. Standing erect, immediately drop as fast as you can into a crouch position then immediately stand up quickly.
3. Standing erect, immediately drop as fast as you can into a crouch position then immediately jump as high as you can onto a platform or box. Step down to repeat one rep at a time.
4. Standing on top of a box step off, land in a squatting position hold, stand up quickly.
5. Standing on top of a box jump off and land in a squatting position (shown in diagram No. 6) then stand up quickly.
6. Standing on top of a box jump off, landing in a squatting position then immediately jump up onto another platform or box (shown in diagram No. 7).
7. Standing on top of a box (not shown in diagram No. 8) jump off, landing in a squatting manner then immediately jump over bar landing in jump position, immediately jumping over bar…...etc. Continue for desired number of repetitions and sets.
Progressing through all exercises must be done prior to selecting workout program. As much as going into a gym for the first time and doing a killer workout, the same will apply to this type of training. The leg soreness (lactic acid buildup) will greatly hinder performance. Start off slow and gradually increase height, speed and length of program.
Diagram No. 6 Diagram No. 7
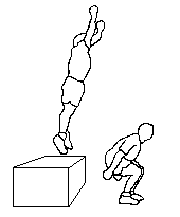
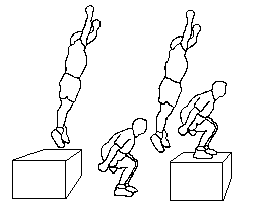
Diagram No. 8
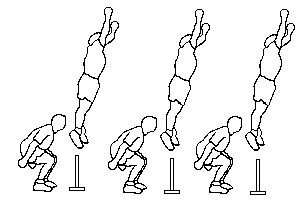
In this series of exercises, we are moving along into more sport specific training. Hockey depends on one-legged explosiveness as opposed to two. While eccentric loading (dropping into position) and static loading (holding position) are elements of hockey found in entry fundamentals of many skating skills (stopping, turning, gliding, etc), two legged explosive power is not. Progressing along we must realize that the energy required to perform a one legged jump is twice that of previous exercises. I
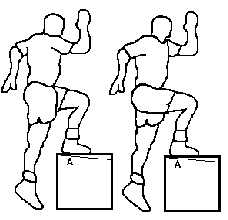
n Diagram No. 9, step-ups provide a foundation from which the other exercises follow. Stepping up quickly and lowering one –self slowly help to build the muscles necessary for the explosive movements.
Diagram No. 9
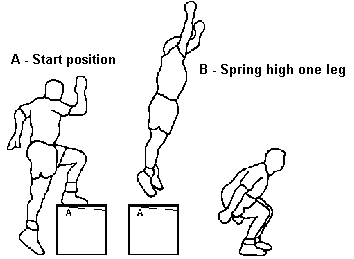
In diagram No. 10 we have the athlete place one leg on the box then as quickly as possible jump as high as is possible and land the other side in a squat position. To land on one leg is not really necessary since the injury risk factor out-weighs training benefits. This is performed as a single action.
Diagram No. 10
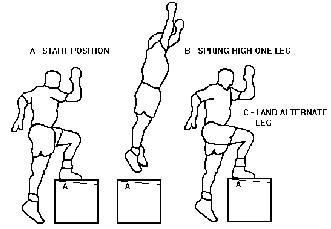
In diagram No. 11 we have the athlete place one leg on the box then as quickly as possible explode as high as possible landing on the other leg on top of the box limiting the eccentric movement as the other leg touches the floor. This action can be performed singularly, alternately (preferred) as well as repetitively (preferred).
Diagram No. 11
One leg training helps to build strong "exit" skating fundamentals. This would include crossovers, tight turns, stop-start, etc. Exiting describes the skating action after a specific skill.
Again, while the above exercises demonstrate linear extension below the body, hockey movements are more specific to adduction (crossover - under and toward the center line of the body) or abduction (striding - away from the center line of the body).
In the following diagrams we again work on a progression format where the under-cross is utilized. This technique is specific to any lateral exit techniques (exiting from crossovers, tight turns, etc). The athlete trains one leg at a time (singularly).
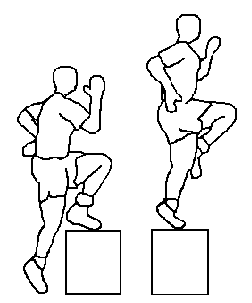
As shown in diagram No. 12, we start the progression using a crossover technique. Standing beside a box or step, one places their inside foot on the top (make sure that the base is stable since force will be exerted laterally as this could turn the box over) extending the leg and foot bringing the outside leg up and across the inside leg. Body weight is over the inside leg. Under cross is minimal but their will be some tension felt in the inside adduction muscles as the outside leg crosses.
Diagram No. 12
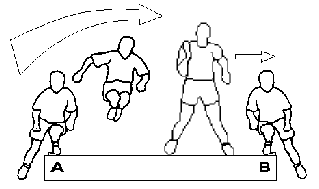
In Diagram No. 13 we utilize a wide box. Shown on the ends are beveled blocks. This limits the stress on the ankle during lateral push-off. The idea is to push off laterally as high and as far as is possible landing on two feet. Move to the side stepping down and perform in the other direction. Width of box A to B is very important in that the force exerted laterally could flip it over. This exercise is the third option drill in series. When first performing this exercise, limit the height of the jump so as to get a feel for it as well as to measure strength of adductors (groin muscles).
Diagram No. 13
In diagram No. 14, we again utilize the crossover technique however continual or set training is used. In this method, one is explosive with the inside leg again, extending the inside leg through on the under cross and landing on the desired step on the outside foot. A pause is taken with the inside leg again positioned properly then repeat.
Diagram No. 14
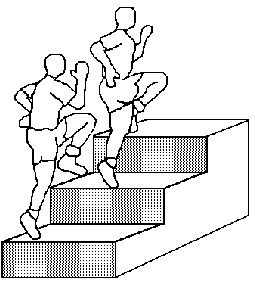
In an alternate exercise the player runs up the stairs sideways or continually extending off both legs concentrating on explosive action on both adduction (under-cross) and abduction (outside leg extension).
Perform exercise to both sides left and right sides.
The following diagrams deal specifically with the Abduction of the leg (pushing away from the body). This skill is sport specific in that it mimics the extension of the leg during skating.
Several different training options are available but care must be taken where flat surfaces are used so as to place minimal stress on the ankle joint.
In Diagram No. 15 the player lunges from a low stance across a designated distance (marker indicated) lands in a crouch and returns.
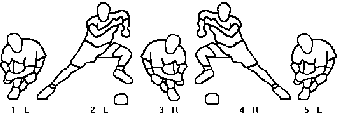
In Diagram No. 16, the player performs the same action as in Diagram No. 15 but a special platform is used where a vaulting board has been angled so as to protect the ankle joint. During skating the ankle is over the blade which, depending on the angle of extension, keeps the foot plane (bottom of the foot) perpendicular to the line of the leg. Stress on the ankle joint is limited in this exercise.
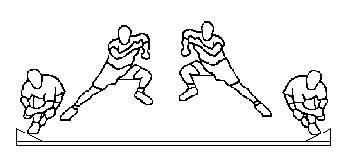
In Diagram No. 17, a forward angle is added to the lateral movement. Proper angle of extension during when striding (skating) is approximately 45 degrees. When landing make sure that the foot is pointing in the original direction of travel (foot leads the jump) ensuring that the athlete lands centered over the foot on the balls of his feet. A slight pause is taken, the loaded foot is rotated so as to point forward (down field) as another lateral jump is performed. Repeat side to side. Limit landing on the side of the foot. When striding (during skating), the front foot or gliding leg points in the desired direction of travel. A hockey player does not move down the ice in a straight line but moves from side to side, tacking like a sail boat against the wind.
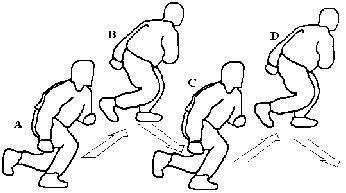
In Diagram No. 18, vertical height is added so as to place a greater load on the thighs. Again, perform original movements as in Diagram No. 17.
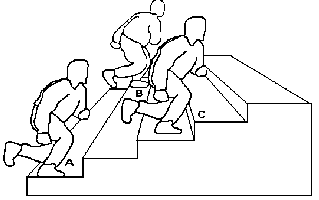
In Diagram No. 19, we are specifically working muscles involved during recovery (illiopsoas) - bringing the foot back under the body after extension. It is important to synchronize arm movements with the legs. Start off easy for a warm-up set then progressively increase speed.
Diagram No. 19
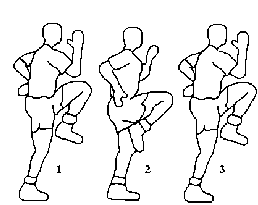
In Diagram No. 20 we are performing side lateral jumps. When jumping extend as far as possible. As you raise the bar, you will find that after extension, knees must come up to the chest as fast as possible so as to clear the bar. This is critical for triggering muscle reflex to initiate recovery of leg as fast as possible.
Diagram No. 20
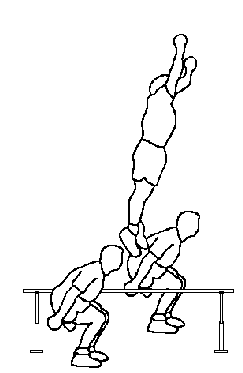
In Diagram No. 21 we are working on muscle endurance of the calves. Skipping is a great exercise for calf development as well as for cardio vascular exercise. There are several skipping exercises that you should perform.
Diagram No. 21
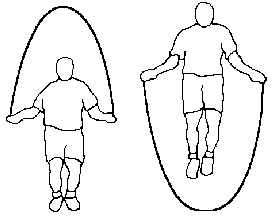
1 – two leg rhythmic concentrating on explosive calves (make sure that heels come into contact with the floor (only slightly) so as to help take the load off the tendon at the back of the foot.
2 – one leg alternate.
3 – knee highs (one leg alternate but bringing knees as high as possible.
4 – "pepper" - one leg alternate as fast as possible.
5 – "pepper" - two leg rope revolutions as fast as possible
Foot Speed Drills
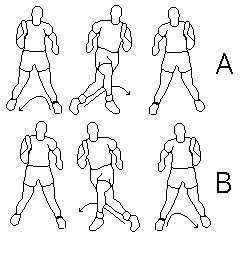
Diagram No. 1 is for lateral foot speed exhibited during left to right – right to left crossover variations during game play. It is important that lateral movement is initiated by "punching in" of left foot towards right as in figure 1 (A) as well as the "stepping out" of the same leg into recovery position shown by arrows in figure 2 (A). Repeat left the right, right to left. Utilize wide recovery base stance. Perform singles and then repetitions, alternating left to right, etc.
Diagram No. 1
1 – Variation is to keep "punch in", crossover and "step-out" close and fast.
2 – as above but widen all movements.
In Diagram No. 2 we add forward running to the exercise. It is important to gauge width and distance so that an angle of 45 degrees maximum is utilized. This keeps the upper body position correct. Keep on toes as much as possible.
Diagram No. 2
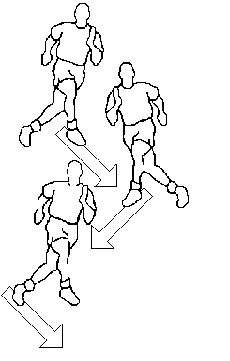
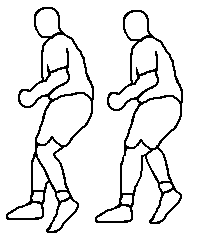
Diagram No. 3 demonstrates backward running and foot speed program. In this example the player performs backward running sprint for 10 quick explosive steps. If starting on the left foot for the first repetition, utilize the right foot for the second. Pause slightly between each repetition.
Diagram No. 3
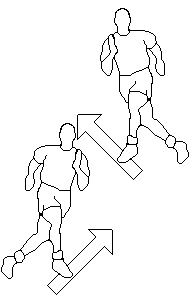
In Diagram No. 4 as in the forward run demonstrated in the previous page angle backwards at approximately 45 degrees performing approximately 10 repetitions to each side as one complete set.
Diagram No. 4
In Diagram No. 5 we combine backward running start with a pivot to forward position. The player would perform two quick backward steps and then pivot either to the left or right. Remember to alternate starting feet which develops pivot to each side.
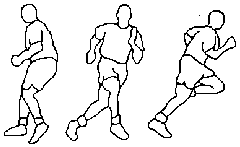
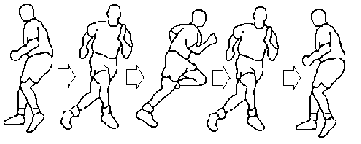
Alternate version would be to combine backward to forward pivot then pivot back to forward alternating down the field making sure to face only to one side (Diagram No. 6 shows player facing only to his left). Work on side then switch performing drill to other side.
Copyright © 1996 by Ron Johnson. All rights reserved.